プログラミング/julia/インストール の履歴(No.2)
更新julia のインストール†
https://qiita.com/phigasui/items/8af41d1bcbe7ef276cfe を見ながら
LANG:console
$ cd
$ git clone https://github.com/JuliaLang/julia.git
$ cd julia
$ git tag | tail
 v0.5.1
 v0.5.2
 v0.6.0
 v0.6.0-pre.alpha
 v0.6.0-pre.beta
 v0.6.0-rc1
 v0.6.0-rc2
 v0.6.0-rc3
 v0.6.1
 v0.6.2
$ git co v0.6.2
$ cat /proc/cpuinfo | grep cpu.cores
  cpu cores       : 2
  cpu cores       : 2
$ make -j4
 ...

 Makefile:85: recipe for target 'julia-deps' failed
 make: *** [julia-deps] Error 2
$ make
 ...

 make[4]: gfortran: コマンドが見つかりませんでした
 Makefile:34: recipe for target 'slamch.o' failed
 make[4]: *** [slamch.o] Error 127
 Makefile:17: recipe for target 'lapack_install' failed
 make[3]: *** [lapack_install] Error 2
 Makefile:210: recipe for target 'netlib' failed
 make[2]: *** [netlib] Error 2
 *** Clean the OpenBLAS build with 'make -C deps clean-openblas'. Rebuild with 'make OPENBLAS_USE_THREAD=0' if OpenBLAS had trouble linking libpthread.so, and with 'make OPENBLAS_TARGET_ARCH=NEHALEM' if there were errors building SandyBridge support. Both these options can also be used simultaneously. ***
 /home/takeuchi/julia/deps/blas.mk:111: recipe for target 'scratch/openblas-85636ff1a015d04d3a8f960bc644b85ee5157135/build-compiled' failed
 make[1]: *** [scratch/openblas-85636ff1a015d04d3a8f960bc644b85ee5157135/build-compiled] Error 1
 Makefile:85: recipe for target 'julia-deps' failed
 make: *** [julia-deps] Error 2
$ sudo apt-get install gfortran
 以下の追加パッケージがインストールされます:
   gfortran-4.9 libgfortran-4.9-dev libgfortran3
 提案パッケージ:
   gfortran-multilib gfortran-doc gfortran-4.9-multilib gfortran-4.9-doc libgfortran3-dbg
 以下のパッケージが新たにインストールされます:
   gfortran gfortran-4.9 libgfortran-4.9-dev libgfortran3
 アップグレード: 0 個、新規インストール: 4 個、削除: 0 個、保留: 2 個。
 6,002 kB のアーカイブを取得する必要があります。
 この操作後に追加で 21.8 MB のディスク容量が消費されます。
$ make
 ...

 /bin/sh: 3: cmake: not found
 *** To install a newer version of cmake, run contrib/download_cmake.sh ***
 /home/takeuchi/julia/deps/llvm.mk:518: recipe for target 'scratch/llvm-3.9.1/build_Release/build-configured' failed
 make[1]: *** [scratch/llvm-3.9.1/build_Release/build-configured] Error 1
 Makefile:85: recipe for target 'julia-deps' failed
 make: *** [julia-deps] Error 2
$ sudo apt-get install cmake
 以下の追加パッケージがインストールされます:
   cmake-data
 提案パッケージ:
   codeblocks eclipse ninja-build
 以下のパッケージが新たにインストールされます:
   cmake cmake-data
 アップグレード: 0 個、新規インストール: 2 個、削除: 0 個、保留: 2 個。
 3,314 kB のアーカイブを取得する必要があります。
 この操作後に追加で 16.6 MB のディスク容量が消費されます。
$ make
 ...

 CMake Error at CMakeLists.txt:3 (cmake_minimum_required):
   CMake 3.4.3 or higher is required.  You are running version 3.0.2

 -- Configuring incomplete, errors occurred!
 *** To install a newer version of cmake, run contrib/download_cmake.sh ***
 /home/takeuchi/julia/deps/llvm.mk:518: recipe for target 'scratch/llvm-3.9.1/build_Release/build-configured' failed
 make[1]: *** [scratch/llvm-3.9.1/build_Release/build-configured] Error 1
 Makefile:85: recipe for target 'julia-deps' failed
 make: *** [julia-deps] Error 2
$ sh contrib/download_cmake.sh
$ ls deps/scratch/cmake-3.7.1-Linux-x86_64/bin/cmake
 deps/scratch/cmake-3.7.1-Linux-x86_64/bin/cmake*
$ make -j4
入った。
コンパイルには非常に時間がかかるので、できれば j オプションで並列実行をしたいところなのだけれど、 並列実行中にエラーが出ると何が悪かったのかが よく分からないことになるみたいだった。
インストールでこけたら j オプション無しで make するといい。
結局、手元環境からだと
LANG:console
$ sudo apt-get install gfortran
$ sh contrib/download_cmake.sh
$ make -j4
とすれば良かったみたいだ。
以下、動作確認。
LANG:console
$ ./julia --version
 julia version 0.6.2
$ ./julia
                _
    _       _ _(_)_     |  A fresh approach to technical computing
   (_)     | (_) (_)    |  Documentation: https://docs.julialang.org
    _ _   _| |_  __ _   |  Type "?help" for help.
   | | | | | | |/ _` |  |
   | | |_| | | | (_| |  |  Version 0.6.2 (2017-12-13 18:08 UTC)
  _/ |\__'_|_|_|\__'_|  |
 |__/                   |  x86_64-linux-gnu

 julia> println("Hello world!")
  Hello world!

 julia> ^D
$
jupyter も入れる†
http 経由で Web ブラウザから使えるようになる。
http://jupyter.org/install.html を見ながら
LANG:console
$ python3 -m pip install --upgrade pip
 /usr/bin/python3: No module named pip
$ sudo apt-get install python3-pip
 以下の追加パッケージがインストールされます:
   libpython3-dev libpython3.4 libpython3.4-dev python3-colorama python3-dev
   python3-distlib python3-html5lib python3-requests python3-setuptools python3-urllib3
   python3-wheel python3.4-dev
 提案パッケージ:
   python3-genshi python3-lxml python3-ndg-httpsclient python3-openssl python3-pyasn1
 以下のパッケージが新たにインストールされます:
   libpython3-dev libpython3.4 libpython3.4-dev python3-colorama python3-dev python3-distlib
   python3-html5lib python3-pip python3-requests python3-setuptools
   python3-urllib3 python3-wheel python3.4-dev
 アップグレード: 0 個、新規インストール: 13 個、削除: 0 個、保留: 2 個。
 42.0 MB のアーカイブを取得する必要があります。
 この操作後に追加で 62.8 MB のディスク容量が消費されます。
$ sudo python3 -m pip install --upgrade pip
 Downloading/unpacking pip from https://pypi.python.org/packages/ac/95/a05b56bb975efa78d3557efa36acaf9cf5d2fd0ee0062060493687432e03/pip-9.0.3-py2.py3-none-any.whl#md5=d512ceb964f38ba31addb8142bc657cb
   Downloading pip-9.0.3-py2.py3-none-any.whl (1.4MB): 1.4MB downloaded
 Installing collected packages: pip
   Found existing installation: pip 1.5.6
     Not uninstalling pip at /usr/lib/python3/dist-packages, owned by OS
 Successfully installed pip
 Cleaning up...
$ python3 -m pip --version
 pip 9.0.3 from /usr/local/lib/python3.4/dist-packages (python 3.4)
$ sudo python3 -m pip install jupyter
$ jupyter notebook
 [I 16:57:56.316 NotebookApp] Writing notebook server cookie secret to /run/user/1000/jupyter/notebook_cookie_secret
 Traceback (most recent call last):
   File "/usr/local/bin/jupyter-notebook", line 11, in <module>
     sys.exit(main())
   File "/usr/local/lib/python3.4/dist-packages/jupyter_core/application.py", line 266, in launch_instance
     return super(JupyterApp, cls).launch_instance(argv=argv, **kwargs)
   File "/usr/local/lib/python3.4/dist-packages/traitlets/config/application.py", line 657, in launch_instance
     app.initialize(argv)
   File "<decorator-gen-7>", line 2, in initialize
   File "/usr/local/lib/python3.4/dist-packages/traitlets/config/application.py", line 87, in catch_config_error
     return method(app, *args, **kwargs)
   File "/usr/local/lib/python3.4/dist-packages/notebook/notebookapp.py", line 1507, in initialize
     self.init_webapp()
   File "/usr/local/lib/python3.4/dist-packages/notebook/notebookapp.py", line 1297, in init_webapp
     self.http_server.listen(port, self.ip)
   File "/usr/local/lib/python3.4/dist-packages/tornado/tcpserver.py", line 144, in listen
     sockets = bind_sockets(port, address=address)
   File "/usr/local/lib/python3.4/dist-packages/tornado/netutil.py", line 163, in bind_sockets
     sock.bind(sockaddr)
 OSError: [Errno 99] Cannot assign requested address
$ jupyter notebook --ip=127.0.0.1 --port=3000
 [I 17:06:49.573 NotebookApp] Serving notebooks from local directory: /home/takeuchi
 [I 17:06:49.573 NotebookApp] 0 active kernels
 [I 17:06:49.573 NotebookApp] The Jupyter Notebook is running at:
 [I 17:06:49.574 NotebookApp] http://127.0.0.1:3000/?token=xxxxxxxxxxxxxxxxxxxxxxxxxxxxxxxxxxxxxxxxxxxxxxxx
 [I 17:06:49.574 NotebookApp] Use Control-C to stop this server and shut down all kernels (twice to skip
 [C 17:06:49.574 NotebookApp]

     Copy/paste this URL into your browser when you connect for the first time,
     to login with a token:
         http://127.0.0.1:3000/?token=xxxxxxxxxxxxxxxxxxxxxxxxxxxxxxxxxxxxxxxxxxxxxxxx
python 版の rvm みたいのがあれば使った方が良かったのかもしれないのだけれど、 とりあえず現状ではその他の用途に python 使う予定がなかったのでそのまま入れた。
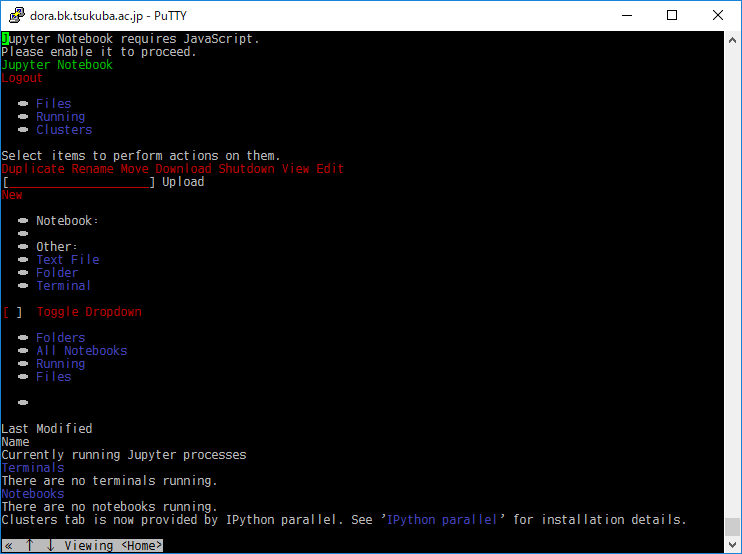
コンソール上では w3m が立ち上がって、以下の表示になった。
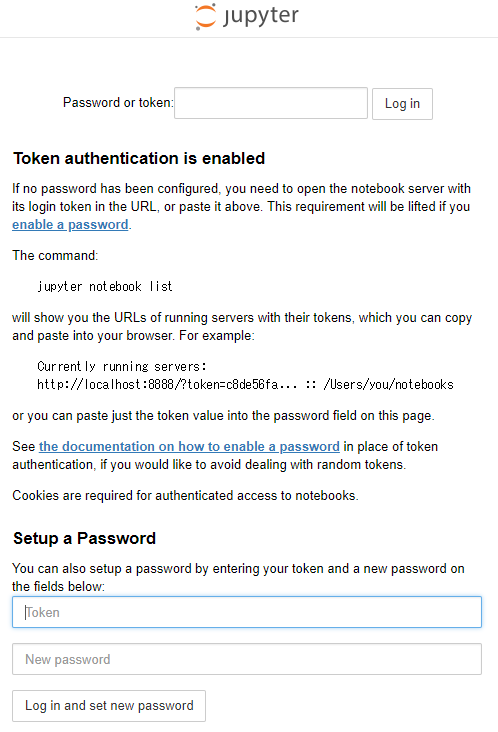
http://localhost:3000/ へアクセスしたブラウザ上では、
となった。
jupyter 起動方法†
LANG:console
$ jupyter notebook --ip=127.0.0.1 --port=3000
として起動した上記の w3m 画面にて q を押して w3m を修了すると、
LANG:console
     Copy/paste this URL into your browser when you connect for the first time,
     to login with a token:
         http://127.0.0.1:3000/?token=xxxxxxxxxxxxxxxxxxxxxxxxxxxxxxxxxxxxxxxxxxxxxxxx
のようにトークン付きのアドレスを確認できる。
表示されたアドレスへブラウザからアクセスしたら、 ホームディレクトリのフォルダとファイルの一覧が表示された。
そこで、
LANG:console
$ mkdir julia-notes
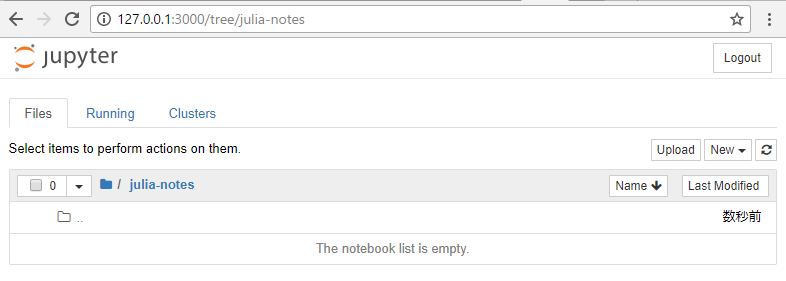
として、julia-notes フォルダを作成し、ブラウザでフォルダをクリックしたら、
のように、空のフォルダの中味が表示された。
でもこのままだとデフォルトで入っている python カーネルしか使えない。
jupyter から julia を使えるようにする†
LANG:console
$ cd
$ ./julia
                _
    _       _ _(_)_     |  A fresh approach to technical computing
   (_)     | (_) (_)    |  Documentation: https://docs.julialang.org
    _ _   _| |_  __ _   |  Type "?help" for help.
   | | | | | | |/ _` |  |
   | | |_| | | | (_| |  |  Version 0.6.2 (2017-12-13 18:08 UTC)
  _/ |\__'_|_|_|\__'_|  |
 |__/                   |  x86_64-linux-gnu

 julia> Pkg.update()
  INFO: Initializing package repository /home/takeuchi/.julia/v0.6
  INFO: Cloning METADATA from https://github.com/JuliaLang/METADATA.jl
  INFO: Updating METADATA...
  INFO: Computing changes...
  INFO: No packages to install, update or remove

 julia> Pkg.add("IJulia")
  INFO: Cloning cache of BinDeps from https://github.com/JuliaLang/BinDeps.jl.git
  INFO: Cloning cache of BinaryProvider from https://github.com/JuliaPackaging/BinaryProvider.jl.git
  INFO: Cloning cache of Compat from https://github.com/JuliaLang/Compat.jl.git
  INFO: Cloning cache of Conda from https://github.com/JuliaPy/Conda.jl.git
  INFO: Cloning cache of IJulia from https://github.com/JuliaLang/IJulia.jl.git
  INFO: Cloning cache of JSON from https://github.com/JuliaIO/JSON.jl.git
  INFO: Cloning cache of MbedTLS from https://github.com/JuliaWeb/MbedTLS.jl.git
  INFO: Cloning cache of Nullables from https://github.com/JuliaArchive/Nullables.jl.git
  INFO: Cloning cache of SHA from https://github.com/staticfloat/SHA.jl.git
  INFO: Cloning cache of URIParser from https://github.com/JuliaWeb/URIParser.jl.git
  INFO: Cloning cache of ZMQ from https://github.com/JuliaInterop/ZMQ.jl.git
  INFO: Installing BinDeps v0.8.7
  INFO: Installing BinaryProvider v0.2.7
  INFO: Installing Compat v0.63.0
  INFO: Installing Conda v0.7.1
  INFO: Installing IJulia v1.7.0
  INFO: Installing JSON v0.17.2
  INFO: Installing MbedTLS v0.5.8
  INFO: Installing Nullables v0.0.5
  INFO: Installing SHA v0.5.6
  INFO: Installing URIParser v0.3.1
  INFO: Installing ZMQ v0.5.1
  INFO: Building Conda
  INFO: Building MbedTLS
  Info: Downloading https://github.com/quinnj/MbedTLSBuilder/releases/download/v0.6/MbedTLS.x86_64-linux-gnu.tar.gz to /home/takeuchi/.julia/v0.6/MbedTLS/deps/usr/downloads/MbedTLS.x86_64-linux-gnu.tar.gz...
  [18:35:43] ######################################################################## 100.0%
  Info: using prebuilt binaries
  INFO: Building ZMQ
  INFO: Building IJulia

 julia> ^D
$ jupyter kernelspec list
 Available kernels:
   julia-0.6    /home/takeuchi/.local/share/jupyter/kernels/julia-0.6
   python3      /usr/local/share/jupyter/kernels/python3
$ jupyter notebook --ip=127.0.0.1 --port=3000
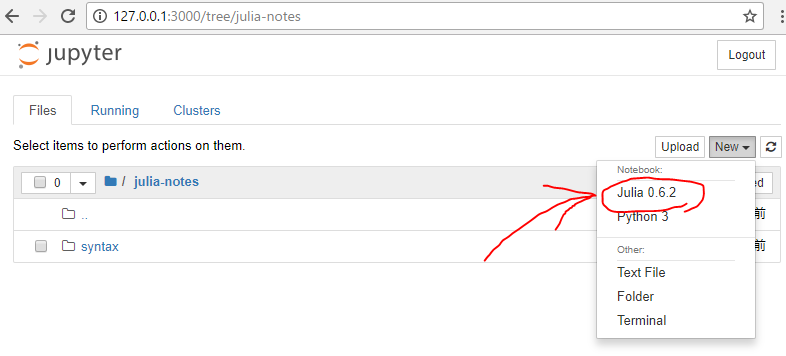
使えるようになった。
フォルダを指定して起動する†
オプションとして --notebook-dir を渡せばいい。
また、w3m の起動が必要なければ --no-browser を付ける。
LANG:console
$ jupyter notebook --ip=127.0.0.1 --port=3000 --notebook-dir=julia-notes --no-browser
Counter: 8189 (from 2010/06/03),
today: 2,
yesterday: 5


